Model-Driven Engineering with EMF
Model-driven engineering is a
software development practice where developers focus on creating models for their problem space rather
than the computer algorithms needed to resolve the problems of that space.
The Eclipse Modeling Framework allows developers to
work with models expressed in one form (e.g. XMI files or annotated Java code), convert the model to
another form, and generate code to view and edit those models.
NexJ Scheme Adapter for Ecore
The Helios release (v3.6) of EMF added
support to Ecore for validation
delegates. This allows a modeler to include invariant and constraint business logic directly in
their models using an expression language.
At runtime (dynamic or code generated), the environment is configured to pass the expression to an
external engine for evaluation to determine model and instance validity.
The NexJ Scheme Adapter for Ecore allows Ecore to use the NexJ Scheme engine as a validation delegate.
Setting Up
The validation delegate functionality is only available in the builds of Eclipse 3.6 (Helios) done
after October 2, 2009. Since the current 3.6 M2 Stable Build is from September 17, you'll need to
work with the 3.6 Stream Nightly Build.
-
1. Configure your Java Environment
-
Ensure you have a Java SDK or Java Runtime Environment required by Eclipse 3.6. The current Java
runtime requirements for Eclipse
seem to hold for 3.6 as well. You can download this from Java SE Downloads.
-
2. Eclipse 3.6.0
-
- Download the Eclipse 3.6.0 from Eclipse Projects Downloads.
- Extract the files to a location on your disk. For example, if you extract to C:\, then the application will exist as C:\eclipse\eclipse.exe.
-
3. NexJ Scheme Adapter for Ecore
-
- Download the NexJ Scheme Adapter for Ecore JAR file
(nexj-scheme-ecore-adapter-VERSION.jar) from the
download page.
- Copy the JAR file to the plugins directory of the Eclipse you
downloaded previously. For example, copy the JAR to C:\eclipse\plugins\.
-
4. Example EMF Library Model
-
- Download the Ecore validation example ZIP file
(ecore-validation-example-VERSION.zip) from the download page, that includes validation constraints written for NexJ
Scheme.
- Extract it to a location on your disk such as C:\Temp\validation-example\; it will be imported into your Eclipse workspace in
a later step.
-
5. Configure Eclipse
-
Start your newly installed Eclipse (for example, run C:\eclipse\eclipse.exe). When prompted for the location of your workspace,
select the location of an existing directory or workspace (e.g. c:\Temp\workspace), or click OK to accept the
default location.
Once Eclipse is running:
- Select the menu entry .
- In the Install dialog:
- Select the site Helios --
http://download.eclipse.org/releases/helios
- Under Modeling, check the two projects "EMF - Eclipse Modeling Framework SDK" and
"Object Constraint Language (OCL) 2.0 Extender SDK"
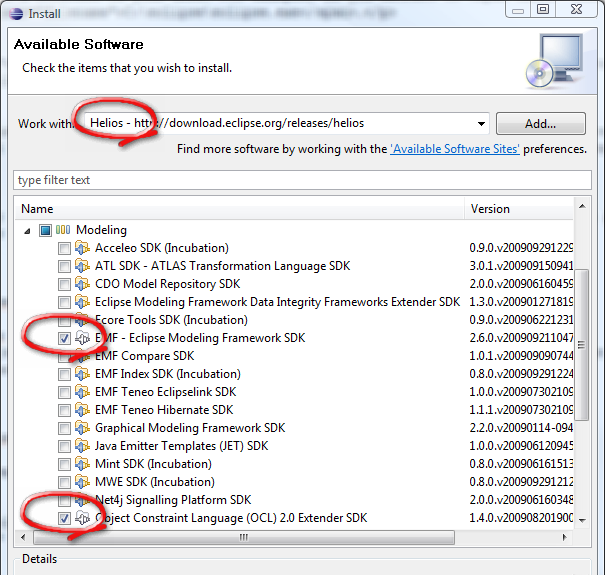
- Click Next, then Next,
accept the terms of the license, then click Finish.
- Click Yes to restart Eclipse
- Select the menu entry .
- In the Import dialog:
- Expand General and choose Existing Projects into Workspace
- Click Next
- Select root directory where you extracted the NexJ Scheme Adapter for Ecore and the
Example EMF Library Model projects (e.g. C:\Temp).
- Check the project org.eclipse.emf.examples.library
- Check Copy projects into workspace
- Click Finish
- If the Welcome To Eclipse page is showing, click the Go to the
Workbench icon.
- Expand org.eclipse.emf.examples.library and open the file
plugin.xml. Then:
- Click the tab Extensions
- Click Add...
- In the list of extension points, select org.eclipse.emf.ecore.validation_delegate and click Finish
- Expand the newly added extension, click the (delegate)
node and set its Extension Element Details with:
- uri: nexjscheme.ecore.NexJSchemeValiadationDelegate
- class: nexjscheme.ecore.NexJSchemeValiadationDelegate
- Save your changes.
- Expand the model folder. Right-click extlibrary.genmodel and select .
- In the EMF Generator editor, right-click the EXTLibrary and
select
Two new projects will now appear in your workspace, org.eclise.emf.examples.library.edit and org.eclipse.emf.examples.library.editor.
Running EMF with NexJ Scheme
Now you will run the Library model editor that was generated from the library model.
- Right-click org.eclipse.emf.examples.library.editor and select
. This will launch a new instance of
Eclipse that contains the Library model editor plugin.
- In new Eclipse, if the Welcome To Eclipse page is showing click the Go to
the Workbench icon.
- Select the menu
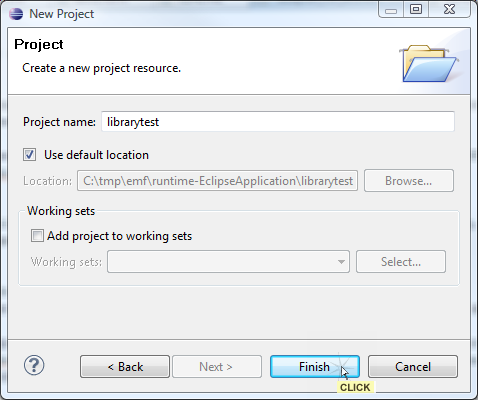
- Expand General and choose Project,
then click Next.
- Set the Project name to librarytest and click Finish.
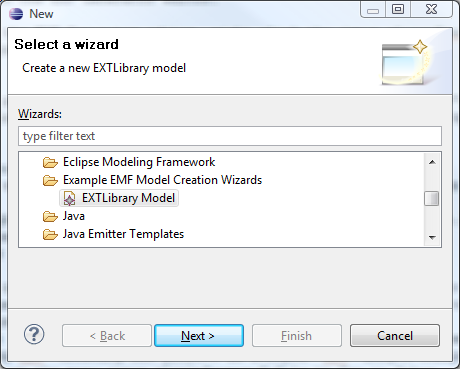
- Select the menu
- Expand Example EMF Model Creation Wizards and choose
EXTLibrary Model, then click Next.
- Set the file name to MyTest.extlibrary and click
Next
- Set the Model Object to Library and click Finish
- Expand MyTest.extlibrary node in the EXTLibrary Model Editor,
right-click the Library node and select
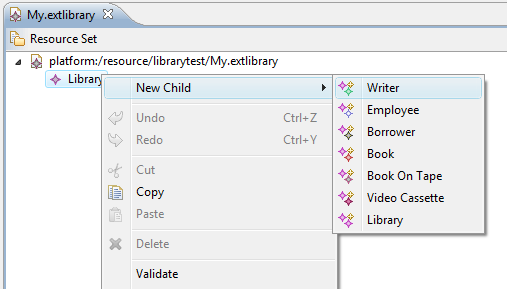
- Right-click the new Writer node and select . In the Properties window for the new Writer object, set:
- First Name: Arthur C.
- Last Name: Clarke
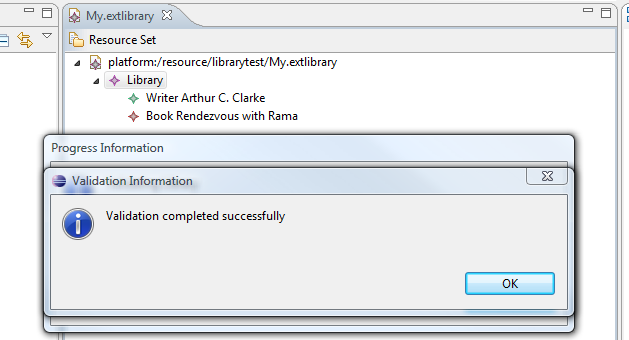
- Right-click the Library node and select . In the Properties view for the new Book object, set:
- Author: Writer Arthur C. Clarke
- Category: ScienceFiction
- Title: Rendezvous with Rama
- Right-click the Library node and select . You should get the message "Validation completed successfully".
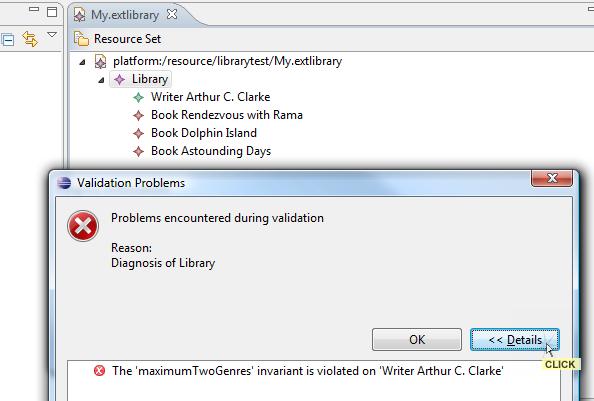
- Add two more Books, both authored by Arthur C. Clarke:
- Category: Mystery, Title: Dolphin Island
- Category: Biography, Title: Astounding
Days
- Right-click the Library node and select . You should get the message "The 'maximumTwoGenres' invariant is violated on
'Writer Arthur C. Clarke'".
- To resolve this validation error, change the category of the "Dolphin Island" book to
ScienceFiction, save and re-validate the Library.
Editing Validation Logic
To view or modify the validation logic, return to the initial instance of Eclipse you ran with the
project org.eclipse.emf.examples.library.
- Right-click the model file extlibrary.ecore and select .
- Expand the nodes platform >> extlibrary >> Ecore
- Inspect the value of validationDelegates node. Notice that both
NexJ Scheme and OCL (Object Constraint Language) are listed.
- Expand the nodes Book >> Ecore.
- Inspect the value of the constraints node. Notice that it lists
mustHaveTitle.
- Expand the node nexjscheme.ecore.NexJSchemeValidationDelegate.
- Inspect the value of mustHaveTitle node. Notice that its value is
Scheme code.
The example model has a "deficiency" in the Scheme validation script. The value of (self'title)
is never null because it always evaluate to an empty string, and an empty string is not null in Scheme.
To modify the validation behavior so that empty strings are not valid:
- Change the value of the Scheme node to be:
(and (not (null? (self'title))) (> (string-length (self'title)) 0))
- Regenerate the projects from the model. In the EMF Generator editor for extlibrary.genmodel, right-click the EXTLibrary and
select .
- Right-click org.eclipse.emf.examples.library.editor and select
. This will launch a new instance of
Eclipse that contains the Library model editor plugin.
- Create a new Book, but do not set a title for it.
- Right-click that new Book node and select . You will now get a
validation error because 'mustHaveTitle' failed.
- Set a title on the Book and revalidate. It is now successful.
Other Resources